photo of a recipe for artisan sourdough bread for beginners

Sourdough bread is more than just a delicious loaf—it's a labor of love that connects you to centuries of baking tradition. With its signature tangy flavor, chewy crust, and airy crumb, sourdough bread is a delight to eat and deeply satisfying to make. Whether you’re a seasoned baker or just beginning your bread-making journey, this guide will walk you through crafting artisan sourdough bread from start to finish.

Ingredients in Sourdough Bread

Sourdough is delightfully simple, requiring just a few basic ingredients:

  • Flour: Use high-quality unbleached bread flour or a mix of bread and whole wheat flour.
  • Water: Filtered or spring water is ideal to avoid any chlorine that might inhibit fermentation.
  • Salt: Fine sea salt enhances the flavor of your bread.
  • Sourdough Starter: This natural leavening agent is a mix of flour, water, lactobacillus (lactic acid bacteria) and wild yeast.

Helpful Tools for Making Sourdough

While you don’t need fancy equipment to bake sourdough, these tools will make the process smoother and more enjoyable:

  • Digital Kitchen Scale: Ensures precise measurements.
  • Bench Scraper: Handy for shaping and handling sticky dough.
  • Banneton Basket: Helps your dough hold its shape during proofing. Bowl with a tea or flour sack towel is an option.
  • Dutch Oven: Creates the ideal steamy environment for a crispy crust.
  • Thermometer: Measures dough temperature for perfect fermentation.
  • Lame or Sharp Knife: For scoring the dough before baking.
  • Mixing Bowls: Use glass or stainless steel for easy cleanup. Glass bowls with straighter sides are ideal. You can see what your dough is doing and how much it has risen.

Using a kitchen scale in sourdough baking is essential because precision is the key to consistent, high-quality results. Here’s why:

  1. Accuracy in Measurements
    Flour, water, and salt ratios must be exact to create the right dough consistency and hydration level.
    Volume measurements (like cups) can vary based on factors such as how tightly ingredients are packed or the type of flour used, whereas a scale provides exact weights.
  2. Consistent Hydration
    The hydration percentage (ratio of water to flour by weight) determines the dough's texture and handling properties. Too much or too little water can drastically affect the outcome, especially with sourdough's long fermentation process.
  3. Easier Adjustments
    When scaling recipes up or down, working with weight makes adjustments much simpler. For instance, doubling a 500g flour recipe to 1kg is straightforward.
  4. Precise Feeding of Your Starter
    A scale ensures your sourdough starter is fed the correct ratio of flour and water, which is crucial for maintaining its health and activity.
  5. Professional-Level Baking
    Artisan bakers and professionals rely on scales because bread-making is a science. Using a scale helps you replicate professional techniques and ensures consistent results every time.

Switching to a scale might seem like an extra step at first, but it simplifies the process in the long run and gives you confidence that your dough will perform as expected.

A Sample Sourdough Bread Schedule

Planning your bake is key for success. Here’s a sourdough baking schedule:

  1. Morning (6:00 AM): Feed your sourdough starter at a 1:1:1 ratio (equal parts, starter, flour, water). Keep at a temp of 74-76 degrees.
  2. Afternoon (10:00 AM): Levain peaks and is ready to use. Mix your dough, starter, water, flour and salt. Let rest for 30-45 minutes.
  3. Afternoon (10:30 AM): Perform 2 sets of stretch and folds and then 2 sets of coil folds 30 minutes apart.
  4. Afternoon (12:30 PM): Bulk Fermentation. Depending on temp of your environment and dough this could take anywhere from 3-8 hours.
  5. Evening (3:30- 8:30PM): Pre-shape, let rest 30 minutes, Final shape, place in banneton, rest 15 minutes, stitch dough.
  6. Evening (4:30-9:30PM): Cold fermentation. Place in refrigerator for 8-48 hours.
  7. 8-48 hours later: Score and bake your dough.

Sourdough Bread Starts with a Sourdough Starter

Your starter is the heart of sourdough bread. It’s a living culture of wild yeast and bacteria that naturally leavens your bread. To create a starter, mix equal parts flour and water, let it ferment at room temperature, and feed it daily for about 2 weeks until it’s bubbly and active. Once established, your starter can last indefinitely with regular feedings.

Sourdough Tips for Beginners

  1. Start with a Strong Starter: A healthy, bubbly starter is critical for a good rise.
  2. Temperature Matters: Dough ferments best at 75–78°F (24–26°C).
  3. Don’t Rush the Process: Sourdough takes time; enjoy the journey.
  4. Hydration Levels: Start with a manageable hydration level (60-65%) before experimenting with wetter doughs.
  5. Practice Scoring: A confident slash ensures the bread expands properly in the oven.

How to Know When Your Sourdough Starter is Ready

Sourdough starter is ready when the dome on top flattens out, it has lots of bubbles on top and throughout the body of the starter. Mark the top of your starter with a marker or elastic and wait 30-45 minutes. If the starter rises more, it has not peaked. Keep marking the top of your starter until it stops rising. That is when it is at its peak rise and is the most optimal time to use it.

Baking Your First Loaf

With patience, practice and time, you’ll master the art of sourdough bread. From nurturing your starter to scoring your dough, every step is an opportunity to connect with the craft of baking. So, grab your apron, dust off your hands, and enjoy the rewarding process of creating artisan sourdough bread.

Print
clock clock iconcutlery cutlery iconflag flag iconfolder folder iconinstagram instagram iconpinterest pinterest iconfacebook facebook iconprint print iconsquares squares iconheart heart iconheart solid heart solid icon
photo of a recipe for artisan sourdough bread for beginners

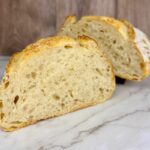
Artisan Sourdough Bread Recipes


  • Author: Dawn North
  • Total Time: 24 hours 45 minutes

Ingredients

Units Scale
  • 125g Active Sourdough Starter
  • 350g Filtered Water
  • 500g Unbleached Bread Flour
  • 10g Salt

Instructions

  • Mix active sourdough starter and filtered water until milky
  • Add unbleached bread flour and salt. Mix with a wooden spoon or dough whisk until combined. Scrape down the sides and bottom of the bowl with a plastic bench scraper. Mix with hands until well combined and the dough has a shaggy consistency. Cover and let dough rest for 30 minutes.

STRETCH & FOLDS

  • Grab a portion of your dough, pull up & gently stretch the dough (do not tear, only stretch as far as it lets you) fold dough over top. Turn your bowl a 1/4 turn and repeat until dough will not stretch anymore and is a tight ball shape. 
  • Cover and let dough rest for 30-45 minutes until dough relaxes. 
  • Repeat previous step 3 times.

BULK FERMENTATION

  • Leave your dough covered in a warm place until it rises 30-35% more than what is already in the dough. BF times vary depending on the temperature and humidity of your environment. BF can take anywhere from 2-8 hours. Your dough should have bubbles on the top and along the edge.  It should pull away from the sides of the bowl easily. 
  • I recommend you use a glass bowl and use the same bowl every time. This will allow you to see what your dough is doing and how much it has risen. With a little trial and error and practice you will learn where that perfect spot is on your bowl to stop BF and shape your dough.

SHAPING/LAMINATING/STITCHING

  • Let your dough self-release out of the bowl. Do not pull or tear your dough.
  • Pick your dough up from the middle and let the sides fall under. Do this a few times until your dough forms a ball.
  • Now do some push and pulls to create tension in the dough. Place your hand, palm side against the dough, behind the dough ball. Push the dough forward 5-6 inches and then turn the ball with your hand in the shape of a candy cane. Your hand should be on the opposite side of the dough ball. Pull back and tuck the dough under the ball. Repeat this motion until the dough ball feels like a hard-boiled egg (Do not tear the top surface of the dough, this will release the tension).
  • Cover with a towel and let rest for 30-45 minutes
  • Final shaping, do push and pulls again until dough feels like a hard-boiled egg.
  • Dust banneton lightly with flour and place dough top side down in the basket. Let rest for 15 minutes.
  • Grap a small piece of dough from the edge and gently pull to the middle. Hold it with your other hand. Repeat this step around the entire perimeter of the dough. Hold in the center for 20-30 seconds until it sticks and stays.
  • Cover dough with a disposable bowl cover or place in a shopping bag and tie it.

COLD FERMENTATION

  • Place your dough in the refrigerator. It is recommended to cold ferment for 8-48 hours. I usually cold ferment overnight.

PRE-HEATING THE OVEN

  • Preheat oven to 450 degrees for 45-60 minutes with the dutch or bread oven inside. Place a pizza stone or cookie sheet on the rack below. This will help distribute the heat evenly and keep the bottom of your bread from getting over cooked.

SCORING

  • Place your dough onto a large piece of parchment paper. Dust with flour. 
  • This is where you can get creative. Do a decorative wheat design by lightly scoring the surface.
  • Cut a deeper control score across the top or along the side of the dough, roughly a ¼ inch deep and at a 45-degree angle. This allows the steam that is created in your dough to escape. Without the deep score your dough will burst open at its weakest point. The control score also helps with create a great oven spring.

BAKING

  • Place your dough on the parchment paper into the Dutch oven and place the cover on top.
  • Bake for 30 minutes with the lid on and then remove the lid and bake for 15 minutes with the lid off. Internal temperature should be 200 degrees.
  • Remove the bread from the Dutch oven and place on a cooling rack. Remove parchment paper while the bread is hot.
  • Let cool for a minimum of 1-2 hours before cutting into it. If you cut the bread while it is hot the inside will be gummy.

EAT & ENJOY!

  • Prep Time: 24 hours
  • Cook Time: 45 minutes
  • Category: Sourdough Bread
  • Method: Oven-Baked